Part 5 - Using the Dugong CLI

Debugging an event-sourced system poses some challenges. While database client tools (such as pgAdmin for PostgreSQL) allow you to inspect the underlying data, they often fall short when it comes to understanding the behavior and aggregate state over time.
For example, you might run a query like this:
SELECT
    *
FROM
    domain_events
WHERE
    "aggregateType" = 'BankAccount'
    AND "aggregateId" = '<id>'
ORDER BY
    "sequenceNumber" DESC;
While this gives you raw domain events, there are several limitations:
- You can inspect event payloads, but not the effect those events had on aggregate state.
- You don't know the state the aggregate was in at the time when the event was created.
- You can’t easily reconstruct or time-travel through the state of the aggregate.
- You lack type-safe tooling for filtering or formatting events.
- You’re forced to interpret raw event payloads, which can be difficult to analyze.
Luckily, DugongJS comes with a developer tool that lets you inspect and interact with event-sourced aggregates directly from the command line. This can be very useful for debugging, troubleshooting and auditing. Let's explore how it works.
Installing the CLI
First, install the dugong cli:
- npm
- pnpm
- Yarn
npm install --save-dev @dugongjs/cli
pnpm add --save-dev @dugongjs/cli
yarn add --dev @dugongjs/cli
Or alternatively, install it globally:
- npm
- pnpm
- Yarn
npm install --global @dugongjs/cli
pnpm add --global @dugongjs/cli
yarn global add @dugongjs/cli
Test the installation by running the following command:
dugong --help
Configuring the Application For the CLI
To use the CLI, we'll need to expose an API for the CLI from our service. We'll use a NestJS microservice to set this up.
First, install the following packages:
- npm
- pnpm
- Yarn
npm install @nestjs/microservices @dugongjs/nestjs-microservice-query
pnpm add @nestjs/microservices @dugongjs/nestjs-microservice-query
yarn add @nestjs/microservices @dugongjs/nestjs-microservice-query
Next, we'll need to convert our application to a hybrid application, because we'll be listening for requests from both HTTP and TCP:
import { NestFactory } from "@nestjs/core";
import { Transport, type MicroserviceOptions } from "@nestjs/microservices";
import { AppModule } from "./app.module.js";

async function bootstrap() {
    const app = await NestFactory.create(AppModule);

    app.connectMicroservice<MicroserviceOptions>({
        transport: Transport.TCP,
        options: {
            host: "localhost",
            port: 3001
        }
    });

    await app.startAllMicroservices();
    await app.listen(3000);
}

bootstrap();
Here, we are setting up a TCP microservice on port 3001. This port should not be exposed to external clients, as it provides direct read-only access to all domain events and aggregates. Instead, you should expose it on an internal port and use port-forwarding or some other secure connection when you need to access it.
Finally, we'll add the AggregateQueryMicroserviceModule to the AppModule:
import { DugongAdapterBuilder, DugongModule, loggerAdapter } from "@dugongjs/nestjs";
import { AggregateQueryMicroserviceModule } from "@dugongjs/nestjs-microservice-query";
import { repositoryTypeOrmAdapter, transactionManagerTypeOrmAdapter } from "@dugongjs/nestjs-typeorm";
import { Module } from "@nestjs/common";
import { TypeOrmModule } from "@nestjs/typeorm";
import { BankAccountCommandModule } from "./bank-account/application/command/bank-account.command.module.js";
import { dataSourceOptions } from "./db/data-source-options.js";

@Module({
    imports: [
        TypeOrmModule.forRoot(dataSourceOptions),
        DugongModule.forRoot({
            currentOrigin: "BankingContext-AccountService",
            adapters: new DugongAdapterBuilder()
                .register(loggerAdapter)
                .register(repositoryTypeOrmAdapter)
                .register(transactionManagerTypeOrmAdapter)
                .build()
        }),
        AggregateQueryMicroserviceModule,
        BankAccountCommandModule
    ]
})
export class AppModule {}
Configuring the CLI
We'll first need to configure the CLI to connect to our application. The quickest way to do this is to set the current context:
dugong config set-context --current --host localhost --port 3001 --adapter nestjs-microservices --transport tcp
You can create and switch between multiple contexts. Run dugong config --help for details.
Running Basic CLI commands
Next, try running the following commands:
dugong get aggregates
This should display a list of your aggregates.
dugong get aggregateids BankAccount
This should display a list of all unique IDs of the BankAccount aggregates you have created.
dugong get aggregate BankAccount <id>
This should return a BankAccount aggregate by ID.
dugong get domainevents BankAccount <id>
This should return a list of all domain events for the BankAccount aggregate by ID.
Dugong Studio
The main feature of the CLI is Dugong Studio. Start Dugong Studio by running:
dugong studio
This will launch an interactive terminal UI, as shown in the screenshot below. Here, you can explore your aggregates, time-travel in the event log and view computed diffs on aggregates based on applied domain events.
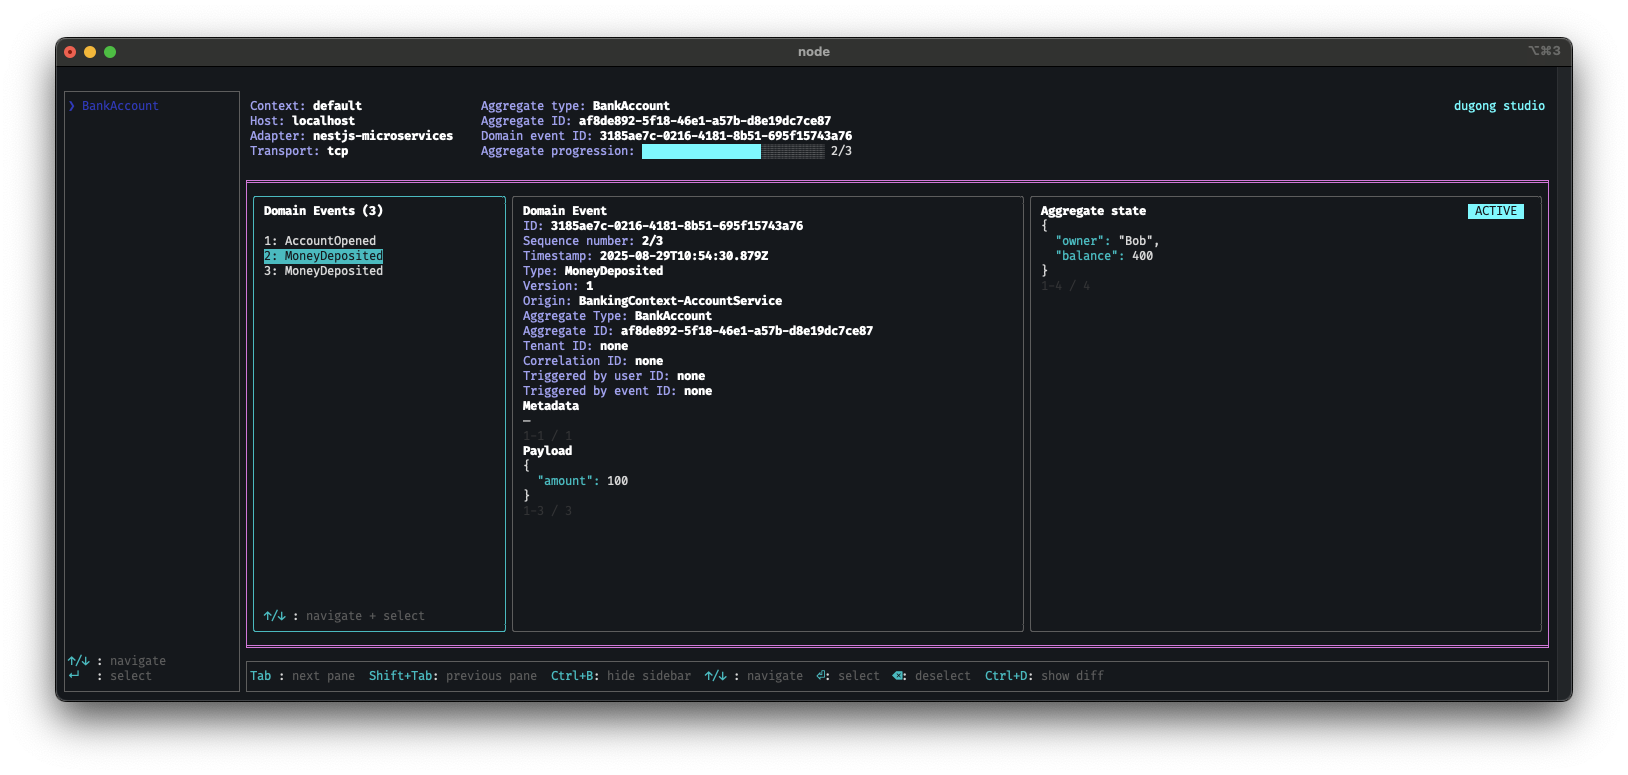
Dugong Studio consists of multiple panes. Use the TAB key and SHIFT+TAB keys to navigate between the different panes. Use the arrow keys to navigate within a pane. Press ENTER to select an item and BACKSPACE to go back. Additional commands are shown at the bottom of the screen.